





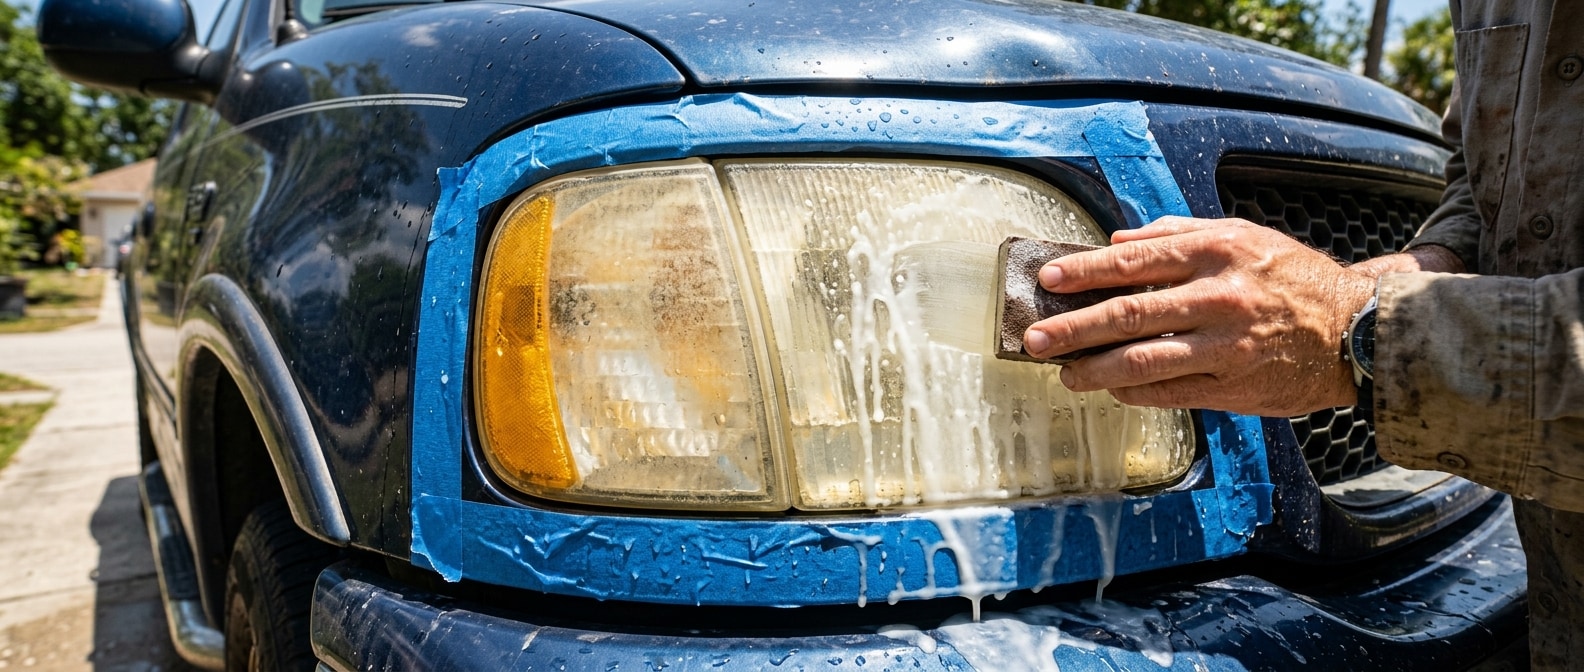
You notice it at dusk on a rainy evening on US-231 heading south, and your headlights feel weak. The road looks dim even with the beam on full. Pull into a parking lot and look at the lens. It's yellow, cloudy, a little chalky. That's oxidation, and in Panama City's Gulf Coast climate it moves fast.
Let's give you the straight answer up front. External oxidation on a polycarbonate lens is fixable with the right process, but only if you add a UV sealant at the end. Skip that step and you'll be back to hazy lenses before next rainy season. Internal fogging, meaning condensation trapped inside the housing, is a different problem entirely and needs a different solution. Figure out which one you have first.
Have our service team take a look before you start sanding
What's Actually Going On Inside That Lens?
You can sort this out before touching any sandpaper, and it takes about a minute. Run the fingernail test on a cool, dry lens, then shine a flashlight at an angle across the surface, and the two together tell you whether the haze sits on the outside or hides inside the housing.
| Symptom | Location | Likely Cause | What to Do |
|---|---|---|---|
| Yellow or chalky haze on the surface | External | UV oxidation of polycarbonate | Sand, polish, seal with UV coating |
| Haze wipes off temporarily with a damp cloth | External | Road film or early-stage oxidation | Clean + protective coat, no sanding yet |
| Uniform milky film visible inside the lens | Internal | Condensation from a failed housing seal | Housing needs resealing or replacement |
| Water droplets or streaks visible inside | Internal | Cracked or broken seal | Professional housing repair |
| Surface is clear but output still feels dim | Bulb/electrical | Bulb age or voltage issue | Bulb replacement or electrical check |
Read that table closely, because a DIY kit does exactly one thing, which is remove and reseal the outside of the lens. If the haze is internal, sanding the outside accomplishes nothing. Touch the lens with a dry fingertip. Feel a rough, faintly gritty texture and you're dealing with external oxidation. If the outside feels smooth and glassy but the cloudiness persists, it's almost certainly inside the housing.
Why Gulf Coast Sun Hits Polycarbonate Lenses Harder
The factory lays a thin UV-protective clear coat over each polycarbonate lens, and that coating is the only thing keeping the plastic clear. Consistent UV exposure from Florida's near-year-round sun gradually breaks it down, and once the coating fails, unprotected polycarbonate oxidizes from the outside in. It turns yellow, then hazy, then opaque.
See how these conditions affect vehicles like the Jeep Grand Cherokee
Panama City's rainy season runs June through September, with August averaging over 5 inches of rainfall. The rain itself isn't what degrades the lens. The trouble is the cycle of intense UV before and after each storm, combined with humidity that stays between 72 and 77 percent year-round according to climate records for the area. The humidity speeds up the breakdown of the polycarbonate surface once the factory coating is compromised. Vehicles parked outside on the Panhandle show oxidation noticeably faster than vehicles garaged consistently.
A severely oxidized headlight lens can reduce effective light output by up to 70 percent compared to a clear lens, according to automotive plastics research on polycarbonate degradation.
That's not a cosmetic problem. On a dark, wet road with rain on the windshield, 70 percent less light reaching the pavement means a dramatically shorter reaction window. Fix the headlights for the same reason you'd fix the wipers.
One thing to check first. Run your hand across the lens when it's cool and dry. A surface that feels rough or gritty is oxidizing externally. A surface that's smooth but still hazy points to internal fogging. Start with this test and you'll avoid sanding a lens that needs housing work instead of restoration.
The Restoration Steps That Actually Last
Restoring a lens well is mostly patience plus one step people skip, and the process below holds through next summer only if you finish with a UV sealant instead of stopping at polish. Most how-to guides stop at "polish and done," which is why headlights cloud back up within a few months. The sealant at the end decides whether this fix lasts.
Step 1: Mask aggressively. Run painter's tape around all four edges of the lens, covering an inch of surrounding paint and trim. Wet sandpaper on bare automotive clear coat creates damage that's significantly harder to correct than cloudy headlights.
Step 2: Wash and dry the lens completely. Use mild soap and water. Any residue under the sandpaper leaves uneven scratches, so don't rush this.
Step 3: Assess oxidation severity and pick your starting grit.
- Light haze only, surface still mostly smooth: start at 1500 grit wet.
- Moderate yellowing with yellow residue on your fingertip after you've rubbed the surface: start at 800 grit wet.
- Heavy chalky crust, lens is deeply pitted: start at 400 grit wet.
Step 4: Work through the grit progression. Wet-sand at each stage until you've fully erased the previous grit's scratch pattern before moving finer. Change direction between grits (horizontal, then vertical, then horizontal) so you can see when each stage's scratches are fully replaced. A common sequence for moderate oxidation runs 800, then 1500, then 2000 grit, all wet.
Step 5: Compound and polish. After your final sanding stage, a rubbing compound on a foam pad removes the sanding haze and brings the lens to optical clarity. Hold it up to a light source. It should be fully transparent, and it shouldn't show any remaining milkiness.
Step 6: Apply UV sealant. Do not skip this. The freshly sanded polycarbonate has zero UV protection. Without a new UV barrier, oxidation restarts within three to six months, and you're back at the beginning. Apply a quality UV-resistant headlight sealant or clear coat per the product instructions, let it fully cure, and remove any masking only after curing.
Jeep Wrangler owners: check here for outdoor-condition service options
Step 7: Maintain it annually. Reapply a UV wipe-on sealant every 12 months, and park in shade when you can. Don't reach for harsh cleaners that strip protective coatings, and dry the lenses after every wash.
Print-and-Go Checklist Before You Start
- [ ] Perform the fingertip roughness test to confirm external (not internal) oxidation
- [ ] Gather painter's tape, spray bottle with water, and clean microfiber towels
- [ ] Select correct starting grit based on oxidation severity (400 / 800 / 1500)
- [ ] Mask all painted surfaces and trim around each lens with at least two tape layers
- [ ] Wet-sand through the full grit progression without skipping stages
- [ ] Compound after final sanding until lens is fully transparent
- [ ] Apply UV headlight sealant and allow full cure time before removing tape
- [ ] Confirm both lenses pass a quick nighttime check before driving in rain
- [ ] Schedule a re-application of UV sealant in 12 months
DIY or Bring It to Our Service Team?
So which route is yours? DIY makes sense when you're dealing with mild to moderate external oxidation, you've got a couple of hours, you're comfortable handling masking and wet-sanding, and you can source a quality UV sealant. Lenses that are lightly hazy often clean up well with patience and the right materials.
Bring it to us at Bay Chrysler Dodge Jeep Ram's service team in any of these cases.
- The oxidation is severe, meaning deep pitting, crazing, or a thick chalky crust that doesn't respond to 400 grit
- You see internal fogging or water inside the housing, which calls for housing disassembly or replacement rather than surface restoration
- You've already done a DIY restoration and the haze returned quickly, a sign the UV seal either wasn't applied or wasn't the right product for Florida conditions
- The lens has cracking or physical damage that restoration can't address
Our team can tell you quickly whether a lens is worth restoring or whether replacement is the more practical path. For some older housings, especially on trucks and SUVs that have spent years parked outside on the Panhandle, the polycarbonate has degraded through the full thickness of the lens and restoration returns diminished results. Worth knowing before you spend two hours sanding.
Schedule a Headlight Inspection
Rainy season visibility starts with clear lenses. Get yours checked before the next Gulf Coast storm rolls through, and give yourself the full beam output your headlights were built to deliver.
Frequently Asked Questions
Can I restore my headlights if the fogging is on the inside of the lens?
No. Surface restoration (sanding and polishing the outside of the lens) only addresses external oxidation. Internal fogging is caused by a failed seal in the headlight housing that allows condensation to enter. That fix requires disassembling or resealing the housing, or in some cases replacing the assembly.
Why do my headlights get hazy again so quickly after I restore them?
The most common reason is skipping the UV sealant step. Freshly sanded and polished polycarbonate has no UV protection. Without a new UV-resistant coating applied at the end, the raw plastic re-oxidizes within months, especially in high-UV climates like Florida's Gulf Coast.
Categories:
Social